Water Globe & Snow Globe Assembly Guide
Water Globe Assembly Guide
Attaching Figurine to Gasket:
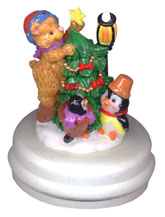
- Glue any suitable waterproof object (Fig. 1) to top of rubber gasket with adhesive that is both flexible and water resistant. Customers have suggested that a product called Zap-A-Gap works best. (Check local stores for availability)
- If you want to add snow or drifting bits to your project, first wash them in plain water, using a fine mesh strainer to remove any dust or chards. Next, wrap material in a piece of cloth & soak in water for up to several days to allow the snow or bits to have sufficient time to settle.
Inserting Gasket & Snow into Globe:
- For best results, assemble Water Globe dry & add water at end of assembly.
- Then, add pre-soaked snow/ drifting bits to dry globe.
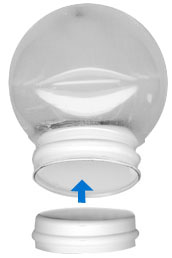
- Next, place the glass globe in your lap. Put the rubber gasket at the top of the neck opening. Place both of your thumbs together & gently push down on the gasket working your way in a clockwise direction.
- Once the gasket is initially seated, start the cycle again, this time pushing the gasket inward until the edge of the raised part of the gasket is well seated in the globe's neck groove.
- Go slowly and do not exert a lot of pressure. The key is not to push too hard.
- When properly seated in globe, the gasket should be flush or nearly flush with the bottom edge of the globe (Fig. 2).
 |  |
Tip: You may find the gasket easier to insert if you put it in your freezer a short time until it is very cold but NOT frozen. The cold will shrink the gasket very slightly, making installation easier. The gasket will expand to normal size as soon as it reaches room temperature. Placing a little water along the gasket's raised part may also help make inserting the gasket easier. Remember, the gasket is designed to fit very tight to prevent water leakage.
Filling the Globe:
- Add distilled water by pulling a small edge of the gasket away from the neck of the globe.
- To eliminate any air pockets, fill the globe with water to overflowing. A few drops of rubbing alcohol added to the water will help to keep bacteria from forming. You may also add a little glycerin to the water to help the bits drift more slowly through the water. (About 1 teaspoon for a 4" globe.)
- Once the globe is filled, reseat the edge of the gasket into the groove in the neck of the globe. It may take several days for drifting bits to move freely in the globe.
Air bubbles will often occur no matter how much the globe is filled. Even some large manufacturers don't guarantee their finished globes to be bubble-free. To minimize this problem we suggest that after filling your globe, you let it stand for a while. If bubbles occur you can then pry an edge of the gasket back and refill with additional water. Let any excess water dry completely from around the edge of the globe and gasket. Only then, seal the edge where the globe and gasket are joined with Silicone Adhesive or E-6000 Adhesive. Once the adhesive is thoroughly dry, secure the globe to its base using the same adhesive.
Adding a Musical Movement:
- Our 4-¾" Water Globes include a Base with a separate bottom plate with feet. The bottom plate is also pre-drilled to accept an 18-note, full-size windup Musical Mechanism. Musical movements are sold separately.
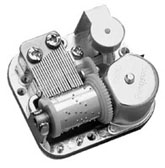
- To install a musical movement, first remove the movement's plastic shell and bottom (Fig. 3). Then secure the movement to the footed bottom plate using screws just removed (Fig. 4).
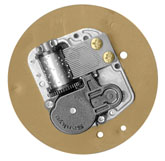
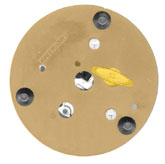
- Figure 5 shows the underside of the bottom plate with musical movement installed, winding key inserted and feet visible.
- Use our shortest T-Bar Key to wind your musical movement (5/16" 221-100-09).
- Attach base insert to base with adhesive.
 |  |  |
Check out all our Water Globe Making Supplies & Add-Ons: |
Water Globe Kits |
Snowflakes, Glitter & Drifting Bits |
Adhesives & Glue |
Sankyo Musical Movements |
Yun Sheng Musical Movements |
18-Note Gold - Amazing Grace |
Winding Keys |
Phone: (330) 562-3500
Toll-Free Phone: (888) 937-2723
E-Mail: sales@nationalartcraft.com
300 Campus Drive, Aurora, Ohio 44202 USA (Map)
Hours: M-F 8:30am - 5:00pm, ET (closings)
SEE OUR GOOGLE REVIEWS: